
 Tweet
Tweet
Gday all,
I brought a no name double din GPS/DVD from ebay and before it turns up I decided to relocate the air-con / vent controls to the bottom single din slot where the 6 stack cd is located.
To complete this you need to remove the six stack in the slot and replace with the air-con vent controls.
The process of removing the centre surrounds to get to the stacker has been posted by forum members (thanks King Triton) so I won’t replicate here (link to process below).
To remove the radio surround is simple (also posted by other members)
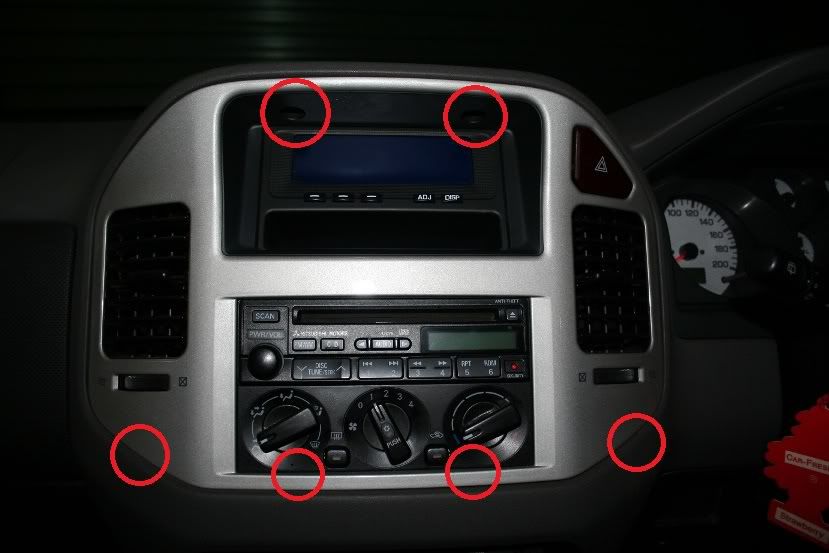
Remove two screws to the top and use a flat screw driver / chisel to push in at the bottom four locations and pull the surround down from the top and out. Unclick the hazard light loom.
To remove the air con / vent unit
1. unscrew four corner screws of unit and pull unit out
2. Unclip 3 loom connectors at back of unit
3. Unclip Vent Dial cable eye on underside of unit
4. Unclip Temperature Dial cable eye on underside of unit
5. Remove unit.
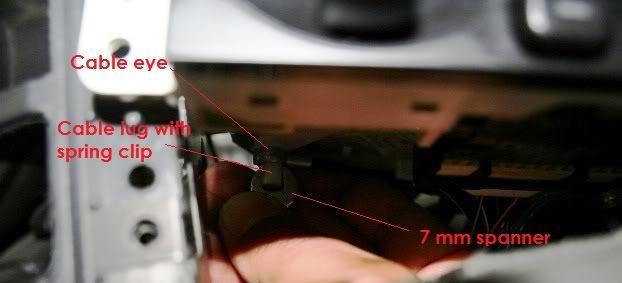
The vent and temperature cables are connected like a brake cable in two locations
1. The cable eye is connected to a plastic lug on the underside of the unit. The
plastic lug has push-in springs on each side to hold the cable eye on.
2. 25 mm down the cable, the cable is crimped by a spring type clip which is pushed
in to the underside of the unit.
Unclipping the cables from the unit stumped me for a while hence the post to show how I removed them.
I used a 7 mm open end spanner and slid if over the plastic lug to push in the springs. I held the spanner in place and pulled the cable eye down at the same time. You will need to access the underside of the unit from the lower din slot.
Next was unclipping the cable from the unit. You need to use a small flat screw driver and push in the clip housing from the top to compress the clip so that is slides out of the unit. Takes a bit of fiddling around but if you put the screw driver to the back of the clip housing (front of car) and lever forward it will compress the clip and you can pull the cable down from underneath with your other hand.
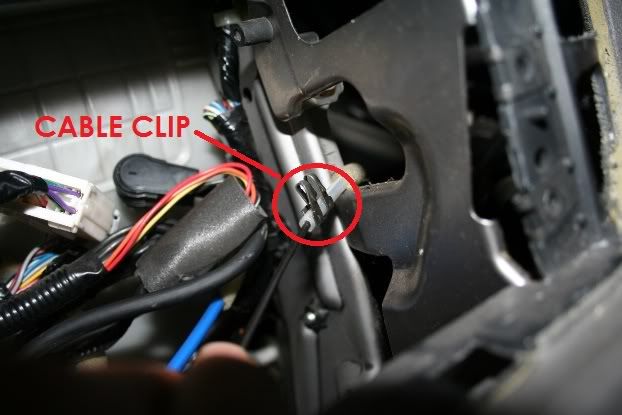
The unit should now be free.
Relocating the unit to the bottom single din was pretty simple.
1. Place in single din slot
2. Plug in 3 looms
3. Reconnect Vent Cable (left cable) eye to plastic lug on the underside of the unit
and push spring clip holding the cable sheath back up into back of unit.
4. Reconnect Temperature Cable (right cable) eye to plastic lug on the underside of
the unit.
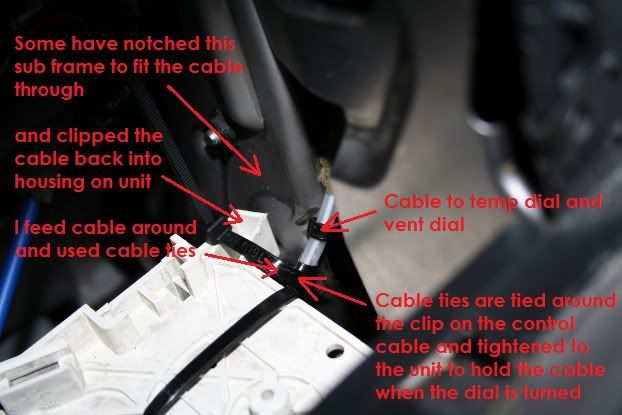
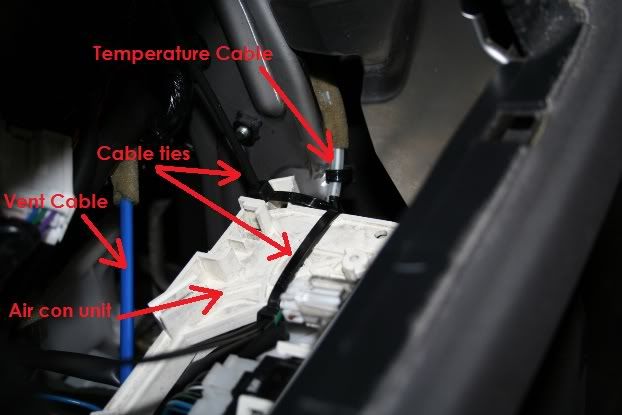
If you try to clip the spring clip holding the cable sheath back up into the back of the unit you will find the metal sub-frame in the way. Some have notched this to fit the cable and some have used cable ties. I selected the cable ties which is really quick and simply.
You need to pull the cable down the outside of the metal frame from the top where it was previously located and attach the ties as detailed. The ties need to be securely fastened to the spring clip to prevent the sheath moving when the Temperature Dial is moved.
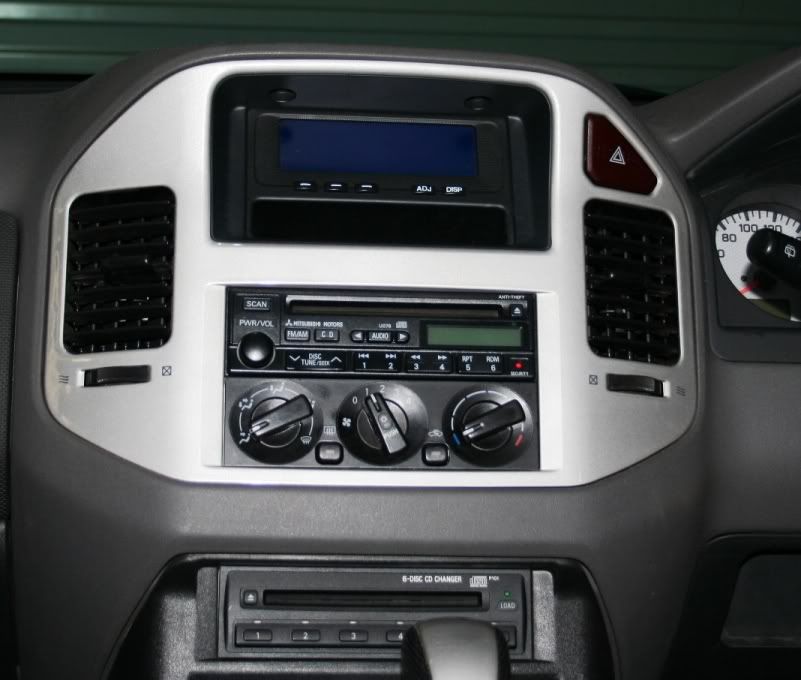
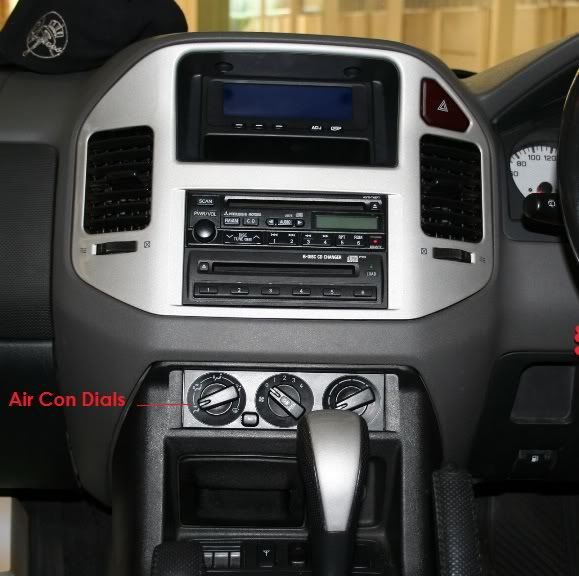
BEFORE
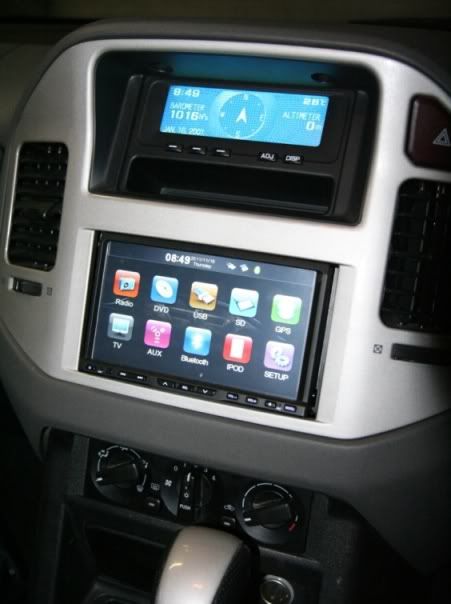
AFTER
Link to remove centre console

Cheers
Des.
I brought a no name double din GPS/DVD from ebay and before it turns up I decided to relocate the air-con / vent controls to the bottom single din slot where the 6 stack cd is located.
To complete this you need to remove the six stack in the slot and replace with the air-con vent controls.
The process of removing the centre surrounds to get to the stacker has been posted by forum members (thanks King Triton) so I won’t replicate here (link to process below).
To remove the radio surround is simple (also posted by other members)
Remove two screws to the top and use a flat screw driver / chisel to push in at the bottom four locations and pull the surround down from the top and out. Unclick the hazard light loom.
To remove the air con / vent unit
1. unscrew four corner screws of unit and pull unit out
2. Unclip 3 loom connectors at back of unit
3. Unclip Vent Dial cable eye on underside of unit
4. Unclip Temperature Dial cable eye on underside of unit
5. Remove unit.
The vent and temperature cables are connected like a brake cable in two locations
1. The cable eye is connected to a plastic lug on the underside of the unit. The
plastic lug has push-in springs on each side to hold the cable eye on.
2. 25 mm down the cable, the cable is crimped by a spring type clip which is pushed
in to the underside of the unit.
Unclipping the cables from the unit stumped me for a while hence the post to show how I removed them.
I used a 7 mm open end spanner and slid if over the plastic lug to push in the springs. I held the spanner in place and pulled the cable eye down at the same time. You will need to access the underside of the unit from the lower din slot.
Next was unclipping the cable from the unit. You need to use a small flat screw driver and push in the clip housing from the top to compress the clip so that is slides out of the unit. Takes a bit of fiddling around but if you put the screw driver to the back of the clip housing (front of car) and lever forward it will compress the clip and you can pull the cable down from underneath with your other hand.
The unit should now be free.
Relocating the unit to the bottom single din was pretty simple.
1. Place in single din slot
2. Plug in 3 looms
3. Reconnect Vent Cable (left cable) eye to plastic lug on the underside of the unit
and push spring clip holding the cable sheath back up into back of unit.
4. Reconnect Temperature Cable (right cable) eye to plastic lug on the underside of
the unit.
If you try to clip the spring clip holding the cable sheath back up into the back of the unit you will find the metal sub-frame in the way. Some have notched this to fit the cable and some have used cable ties. I selected the cable ties which is really quick and simply.
You need to pull the cable down the outside of the metal frame from the top where it was previously located and attach the ties as detailed. The ties need to be securely fastened to the spring clip to prevent the sheath moving when the Temperature Dial is moved.
BEFORE
AFTER
Link to remove centre console
Cheers
Des.
 Snorkle


Comment