Below Nav Bar

Collapse

DIY Fuel Tank in Rear Seat Well - Part 1

Collapse
X
 
  • Filter
  • Time
  • Show
Clear All
new posts
  • Soups
    Junior Member
    • Jan 2012
    • 20
    • Footscray

    DIY Fuel Tank in Rear Seat Well - Part 1

    After reading lots of posts in the forum about long range fuel tanks and seeing what the aftermarket has to offer, I decided to do it myself and have a tank made to fit into the rear seat well of my NM Exceed. I have read many posts by people who suggest it may be dangerous and may not be roadworthy, etc, etc, but I believe it is OK. If my car was petrol rather than diesel I may have been a bit more reluctant due to the extra volatility of the fuel but I still think it would be OK.

    Firstly – is it legal? Well here in Victoria I would say, “Yes” although I haven’t had the vehicle inspected. Having worked for busy roadworthy inspector for many years and attended many Vicroads roadworthy seminars, I know that different RWC testers interpret the rules in different ways. However, here is what Vicroads VSI 26 (Roadworthy Requirements) says about fuel systems:
    http://www.vicroads.vic.gov.au/nr/rdonlyres/e5f44416-57e4-4164-98f5-69e3e8e1c5e3/0/vsi26.pdf
    Fuel tanks must be securely mounted and the fuel system including fuel lines and filler pipes must not project beyond the widest part of the vehicle.
    Additional or replacement fuel tanks must be at least of an equivalent standard to the original tanks and not affect the vehicle’s compliance with evaporative emission or other provisions.
    All fuel lines, vent lines, pumps, valves and fittings must be secure, free of leaks, adequately protected from damage and must not chafe or rub against each other or other parts of the vehicle.
    Fuel filler caps must be secure and seal properly. Plastic emergency fuel filler caps are not acceptable.

    The roadworthiness requirements in Victoria are in large part based on the Australian Design Rules. Here is a link to Australian Design Rule 17 relating to fuel systems for new motor vehicles, effective up to 2nd August 2005 (not sure what is applicable after that date). http://www.infrastructure.gov.au/roads/motor/design/pdf/17.pdf. There are a number of relevant paragraphs in the ADR. For example, clause 17.3.4 states, “No part of the fuel tank or the filler pipe shall be located within or above the vehicle cabin unless separated by a metal or other approved fire resistant barrier …”
    Clause 17.4.2 states, “The device for controlling the flow of fuel from or between fuel tanks shall be located either within reach of the driver from his normal seating position or outside the driver’s cabin.”

    In these posts, I am going to show you how I did the fuel tank install – I am not going to enter into a debate about whether it is safe or legal or not. If you want to comment on that aspect of the modification, feel free to do so but I will not waste my time responding. I have done my research and am happy in my decision. By the same token, for anyone considering doing the same thing, I recommend you do your own research to make sure you are happy it is safe and legal.

    I'm sorry about giving the story in so many posts but I wanted lots of photos and I can only upload 5 pics with each post.

    The tank
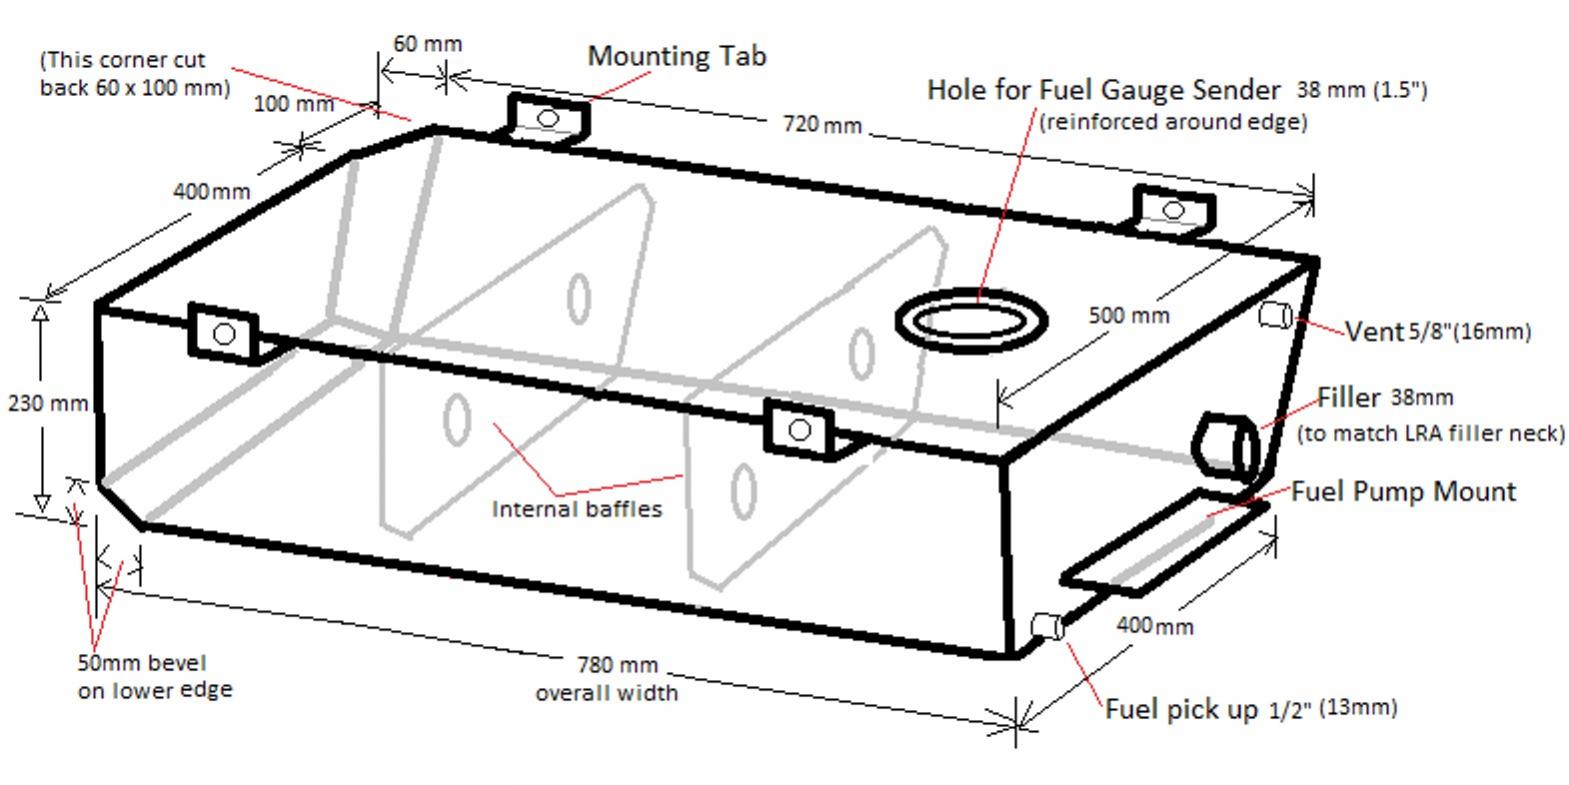
    After lots of head scratching and measuring, I came up with this basic design to be made up in 3mm aluminium. I then headed off to find a sheetmetal shop that would make it for me at the right price. A local guy, Barry at E-Qip Sheetmetal in Braybrook quoted me $550. He realised later that he should have quoted higher as we spent a fair bit of time discussing, checking dimensions, trial fitting and making minor modifications to the design, but he's a good bloke and he stuck to his quote. I’ve incorporated our changes into these drawings so they should be fairly accurate. The position of the fuel filler is fairly critical. It cannot be any higher in the tank as it needs to go under the chassis rail once the pipe exits the seat well. It is also positioned so that it goes through the side of the seat well where the steel is flat and not creased.
    Click image for larger version

Name:	Fuel Tank Drawing.jpg
Views:	1
Size:	111.7 KB
ID:	992732 Click image for larger version

Name:	Fuel Tank End View.jpg
Views:	1
Size:	71.1 KB
ID:	992733

    Here are some pics of the completed tank with the fuel sender in place. I glued some 3mm industrial neoprene to the sides and bottom of the tank to prevent metal to metal contact with the car’s body.

    Click image for larger version

Name:	2012-12-21 22.35.01.jpg
Views:	1
Size:	92.0 KB
ID:	992729 Click image for larger version

Name:	2012-12-21 22.36.27.jpg
Views:	1
Size:	92.3 KB
ID:	992730 Click image for larger version

Name:	2012-12-21 22.39.59.jpg
Views:	1
Size:	101.2 KB
ID:	992731

    Go To Part 2 of the thread
    Last edited by Soups; 03-07-13, 06:10 PM.
  • Soups
    Junior Member
    • Jan 2012
    • 20
    • Footscray

    #2
    DIY Fuel Tank in Rear Seat Well - Part 2

    Fitting
    In order for the tank to fit into the seat well in the car, I stripped out all the plastic panels in the rear of the car and the plastic seat well cover. I then had to get serious and remove the mounting brackets for the jack and jack handle. These are spot welded on, so I ground a suitable sized drill bit flat on the end and used it like a router to drill off the top of the spot welds without going through the car body. Good in theory! It worked OK for the handle brackets but some of the welds for the actual jack bracket are impossible to attack straight on so I ended up making some small holes in the body which I then had weld up again. It looks fine with some underbody sealer over the welds. An alternative way would be to flatten the brackets instead and leave them in place.
    Click image for larger version

Name:	2012-10-02 14.48.03.jpg
Views:	1
Size:	96.1 KB
ID:	965589 Click image for larger version

Name:	2012-09-22 10.12.19.jpg
Views:	1
Size:	98.7 KB
ID:	965590 Click image for larger version

Name:	2012-10-02 15.38.06.jpg
Views:	1
Size:	98.0 KB
ID:	965591
    Because the tank has to be separated from the passenger compartment with a metal barrier, I had to make a new floor to cover the tank. I purchased an offcut of 1.6mm thick steel sheet from the local steel supplier and cut it to shape using a thin cutting wheel on the angle grinder. I had to bend and shape the ends a little to fit over the base of the rear seat latch brackets (this is not shown in the photos).
    Click image for larger version

Name:	2012-12-11 20.30.09.jpg
Views:	1
Size:	93.7 KB
ID:	965592 Click image for larger version

Name:	2012-12-22 18.20.02.jpg
Views:	1
Size:	94.6 KB
ID:	965593
    When the tank was trial fitted, I marked out where to cut the hole in the side of the seat well for all the pipes to go through and then cut it with a nibbler on the end of my electric drill. We also positioned the mounting brackets on the top of the tank and E-Qip welded them on. I drilled through the mounting brackets and the seat well so that the tank could be bolted in place.

    Go to part 3 of the thread

    Comment

    • Soups
      Junior Member
      • Jan 2012
      • 20
      • Footscray

      #3
      DIY Fuel Tank in Rear Seat Well - Part 3

      Plumbing
      The commercial long range tank suppliers seem to use the same type of solid-state Facet type fuel pump to transfer the fuel from the aux tank to the main tank. Although they are cheap and reliable, they are also slow. I bought and then returned a “high-flow” pump that was supposed to pump 8 litres per minute but actually only pumped about 2 per minute. I think more than half an hour to transfer the tank contents is just too long. I ended up buying a Rule Amazon IL280P marine inline pump which claims to pump 1080 litres per hour. In theory I should be able to transfer the tank in around 5 minutes – much better!
      Click image for larger version

Name:	2012-10-05 12.37.34.jpg
Views:	1
Size:	101.9 KB
ID:	965594 Click image for larger version

Name:	2012-12-23 11.03.12.jpg
Views:	1
Size:	99.2 KB
ID:	965595
      I fitted the pump to the mounting bracket on the side of the tank with a piece of neoprene underneath it to cushion it and secured it with 2 cable ties. I then realised that I would never be able to bend the fuel hose from the tank outlet onto the pump without kinking so I got a brass ½”barbed elbow to go in the fuel line. (The observant reader will notice that the pump is facing the other way in later pictures. Make sure you fit the pump the right way first time round! It is not possible to pull the pump off a full tank of diesel without making a hell of a mess. I also found out that the factory rubbery sound deadening material in the seat well does not like diesel fuel – it goes all gooey and sticky.)

      To cover the hole I had cut in the side of the seat well, E-Qip made up an aluminium plate with all the fuel pipe penetrations. There are pipes for the filler, the fuel delivery line and the tank vent. The extra 10mm pipe in the plate is to vent the actual seat well to atmosphere so that any fumes cannot build up in the event of a leak. You will see the fuel delivery pipe is angled so that there is no chance of the rubber hose kinking where it comes from the pump. The whole plate is sealed to the body with Sikaflex and pop riveted on. I connected the various hoses to the plate, slid the tank into place and connected the other ends of the hoses. Voila!
      Click image for larger version

Name:	2013-01-26 12.19.49.jpg
Views:	1
Size:	94.1 KB
ID:	965596 Click image for larger version

Name:	2013-01-26 12.20.07.jpg
Views:	1
Size:	99.5 KB
ID:	965597 Click image for larger version

Name:	2013-01-26 15.51.29.jpg
Views:	1
Size:	98.9 KB
ID:	965598

      Go to part 4 of the thread.

      Comment

      • Soups
        Junior Member
        • Jan 2012
        • 20
        • Footscray

        #4
        DIY Fuel Tank in Rear Seat Well - Part 4

        Plumbing (continued)
        Pics of fuel tank fitted and hoses connected to the plate through the bodywork. Click image for larger version

Name:	2013-02-09 10.39.25.jpg
Views:	1
Size:	92.4 KB
ID:	965599 Click image for larger version

Name:	2013-01-26 15.51.10.jpg
Views:	1
Size:	97.2 KB
ID:	965600

        I purchased a dual filler neck from Long Range Automotive in Lilydale for $149. I removed the right rear wheel to gain access for this part of the job. After removing the plastic cover over the fuel pipes, undoing a few bolts and hose clamps, the filler pipe came out easily. I lay the new filler and the old filler on the ground and worked out where to cut the original pipe. When I fitted the new filler and the lower part of the original pipe to the car, I found they did not line up properly so I had to heat and bend the new filler a bit as there was no way the rubber hose would bend enough to join them. LRA supplies brass elbows to screw into the filler neck to connect up the fuel lines. I had to replace the fuel delivery elbow with a larger ½”elbow due to the larger diameter fuel line on the Rule pump. Once I had the filler re-installed, I took the car to an exhaust shop and had them bend up a steel filler pipe to service the auxiliary tank. I connected all the external fuel and tank vent lines to the filler.
        Click image for larger version

Name:	2012-12-30 12.37.18.jpg
Views:	1
Size:	95.4 KB
ID:	965601 Click image for larger version

Name:	2013-02-17 11.07.57.jpg
Views:	1
Size:	93.1 KB
ID:	965602 Click image for larger version

Name:	2013-02-17 12.06.54.jpg
Views:	1
Size:	93.9 KB
ID:	965603

        Go to part 5 of the thread.

        Comment

        • Soups
          Junior Member
          • Jan 2012
          • 20
          • Footscray

          #5
          DIY Fuel Tank in Rear Seat Well - Part 5

          Plumbing (continued)
          More pics of the external pipe connections. Click image for larger version

Name:	2013-02-17 12.28.27.jpg
Views:	1
Size:	72.0 KB
ID:	965604 Click image for larger version

Name:	2013-02-17 12.08.28.jpg
Views:	1
Size:	96.1 KB
ID:	965605 Click image for larger version

Name:	2013-02-17 12.58.47.jpg
Views:	1
Size:	97.0 KB
ID:	965607 Click image for larger version

Name:	2013-02-17 14.49.55.jpg
Views:	1
Size:	93.7 KB
ID:	965606

          To vent the seat well cavity, I ran a 10mm hose to the rear of the car and up behind the driver’s side tail light. I put a 180 degree bend in the end of the hose and taped a bit of mesh over the end to help keep out dust, water and spiders.

          This is starting to look like a successful project!

          Go to Part 6 of the thread.

          Comment

          • Soups
            Junior Member
            • Jan 2012
            • 20
            • Footscray

            #6
            DIY Fuel Tank in Rear Seat Well - Part 6

            Electrical
            There were a couple of problems caused by using the Rule pump. Firstly it is not self-priming, so it must be mounted below the fuel level to begin pumping fuel. It is not possible to mount the pump below the tank but it is no real problem; I just need to make sure I keep at least ¼ of a tank in the reserve tank and there is enough space in the main tank before starting the fuel transfer. The second, potentially more serious problem is the pump cannot be run dry for long. I knew that if I just had an on/off switch, at some stage I would forget to turn the pump off and it would run dry and burn out. The solution was to fit a time delay relay in the circuit. I sourced an adjustable relay from Wolstentech in the USA and have set it to turn off after 10 minutes which is enough time to transfer the reserve tank to the main tank without running the pump dry for long.

            I originally got a universal fuel gauge and sender on E-Bay but couldn’t find a suitable spot to mount the 50mm diameter gauge. I thought that a small LED gauge like LPG vehicles use would be much better. Apexus makes a small gauge with a button that I was able to just fit into one of the switch blanks in front of the gearshift. It is easily reached, easily visible and doesn’t look ugly. It is compatible with a standard GM 0-90 ohm sender and a suitable one was procured cheaply via E-Bay.
            Click image for larger version

Name:	2012-12-06 21.16.12.jpg
Views:	1
Size:	97.5 KB
ID:	965608 Click image for larger version

Name:	2012-12-06 22.20.30.jpg
Views:	1
Size:	85.6 KB
ID:	965609 Click image for larger version

Name:	2012-12-30 12.04.39.jpg
Views:	1
Size:	94.9 KB
ID:	965610 Click image for larger version

Name:	2012-12-30 12.13.51.jpg
Views:	1
Size:	43.0 KB
ID:	965611
            I have fitted a fuse box inside the passenger side kick panel that runs off the auxiliary battery. I mounted the timer relay in here as well and powered the relay and pump from here. I took out the front seats and ran the wires for the pump and sender under the carpet across to the driver’s side of the car and then along under the trims all the way to the rear where I terminated them with a plug near the rear aircon unit. (I followed the same route I used for my power cable from the auxiliary battery to the Anderson plug in the back for my fridge. You can see it in the photo.)
            I drilled a 10mm hole in the new steel floor as close as possible to the right edge and installed a short wiring loom with a 3 pin plug at each end – pump power, sender signal and a common ground wire.
            I made up a suitable loom for both the sender and the pump so they could be unplugged and removed separately if necessary.

            Go to Part 7 of the Thread
            Last edited by Soups; 03-07-13, 06:15 PM.

            Comment

            • Soups
              Junior Member
              • Jan 2012
              • 20
              • Footscray

              #7
              DIY Fuel Tank in Rear Seat Well - Part 7

              Testing and Tidying Up
              I filled the tank as full as I could get it – right up to the top of the filler tube to see if there were any leaks, and sure enough there was. The only problem was the fuel gauge sender. Fuel was seeping up though the screws that secure it to the tank and also up through the centre pin. I got some small nylon washers from Jaycar to seal the mounting screws and they did the job perfectly. The centre pin on the sender was a bit more fiddly. A nylon washer didn’t fix it. I had to remove the sender from the tank and dismantle the top to remove the centre pin. I then used some thread lock/sealant under the internal and external washers and also on the thread – this did the trick. When I refitted the sender I also put some sealant on the mounting screw threads for good measure. I refilled the tank completely and drove around for a couple of weeks to check all was OK before finally fitting and sealing the rear floor. I put some rubber matting on the top of the tank to take up the space between the tank and floor just in case I was carrying a heavy load in the back and also glued a small piece of neoprene above the sender to prevent it grounding on the floor panel. The floor panel is sealed to the car body with Sikaflex and secured with lots of screws and the bolts that hold the rear seat latches.
              Click image for larger version

Name:	2013-04-06 10.07.26.jpg
Views:	1
Size:	99.9 KB
ID:	965612 Click image for larger version

Name:	2013-04-20 17.06.05.jpg
Views:	1
Size:	100.2 KB
ID:	965613
              The original rear carpet sections didn’t fit any more so I got some grey marine carpet and underfelt from Clark Rubber and made up a new carpet. Because the plastic inner quarter panel trims and the rear sill cover could not drop down into the seat well any more, I had to trim off the bottom edges so they so they would fit flush with the new floor. All back together, it looks like a factory finish. I’m a happy man.
              Click image for larger version

Name:	2013-02-17 15.46.59.jpg
Views:	1
Size:	96.5 KB
ID:	965614 Click image for larger version

Name:	2013-07-02 11.26.55.jpg
Views:	1
Size:	98.0 KB
ID:	965615
              Pros
              · Extra 75 litres of useable fuel
              · No loss of ground clearance at the rear from an underslung tank
              · Almost invisible installation
              · Relatively rapid fuel transfer
              · Can still fit third row seat if I pull out my drawer system
              · All done for around $1600 (not counting many hours of thinking and labour)
              · Complete system can be removed relatively easily and restored pretty much to standard if desired

              Cons
              · I have lost the storage space under the floor in the rear which meant I had to make a rear drawer system, (not too much of an issue because I needed a fridge slide anyway)
              · Filling the tank is slow once the fuel level in the tank gets above the fill pipe level (about ½ full). Possibly the fill pipe could have entered at the front of the tank which might have allowed it to be mounted higher in the tank.
              · The fuel delivery pipe from the reserve tank attaches to the main tank fill pipe at 90 degrees and close to the top of the pipe. Because the Rule pump delivers the fuel at a high rate, the fuel hits the other side of the pipe with force and a lot splashes back out of the fill pipe into the collector box at the top of the dual filler and runs back down into the reserve tank. While in theory I should be able to transfer a full fuel load from the reserve to main tank in well under 10 minutes, it actually takes longer. If I ever get around to it, I will try to alter the screw in fitting so that it directs the fuel down the pipe toward the main tank.
              · If I did it again, rather than purchase the fuel gauge with integrated switch, I would purchase a gauge only and mount a separate momentary switch. On the gauge I have, the button is designed to turn on when pressed and off when it is pressed again – the built in indicator light shows when the switch is turned on. Because I have the timer relay, the indicator light does not necessarily show that the pump is on, only that the switch is on. Because the relay only needs a momentary trigger, a separate switch and indicator light would be better as the light could be wired to come on when the pump was energised. I can live with it.
              Click image for larger version

Name:	2013-07-02 11.30.01.jpg
Views:	1
Size:	97.1 KB
ID:	965616
              Cost Breakdown
              Tank (inc. extra to drill & tap for fuel sender), E-qip Sheetmetal, $595
              Pipe penetration plate, E-qip Sheetmetal, $85
              Neoprene rubber sheet, Absolute Rubber, $58
              Rule Amazon IL280P Fuel Pump, Whitworths Marine, $55
              Fuel Gauge Sender, E-Bay (USA), $32
              Fuel Gauge/Switch (Apexus PG200b2), Long Range Automotive, $70
              Dual Filler Neck, Long Range Automotive, $149
              Steel Fuel Pipe, Bros Exhaust, $90
              Delay Timer Relay (TDR-PMLC), Wolstentech Innovations (USA), $34
              Various fuel/vent hoses and clamps, Various suppliers, $160
              Wiring, fuse block, plugs, connectors, etc, Jaycar, etc, $50
              Steel for rear floor, Malouf Steel Supplies, $20
              Nuts, bolts, screws, sealant, adhesive, paint, etc, Various suppliers, $70
              Carpet & Underfelt, Clark Rubber, $138
              Beer, CUB, $???
              Total $1606

              It is now July, and I have had the system finished and working since March. When I fill with fuel, I usually fill the reserve tank and then pump to the main just to keep the fuel in the reserve tank from going stale and to ensure everything is still working OK. So far it’s all working well and despite a few small improvements I see I could have made, I am very happy with the finished result.

              Now, to finish those drawers ...
              Last edited by Soups; 03-07-13, 06:18 PM.

              Comment

              • amr75wcr
                Valued Member
                • Dec 2009
                • 1543
                • Sunny Coast

                #8
                Top job and write up
                You certainly went to more trouble than I did when we did the same
                Wayne
                04 NP DID GLX ARB Steel Bullbar 2" ARB/King Springs, Billies, Warn Winch, Rhino Track Mount Racks, Rola Basket, Rallye 4000 HID, UHF, Reverse camera, Custom Console, Fridge Slide and Rear Door Table, DVD Screen, 40lt Engel, Dual Battery Sytem with Auto Isolator, Cargo Barrier, polaris gps, Sat Phone, BFG A/Ts, Foxwing awning, ARB Locker, Bush Skinz sliders $ inter plate, 3" exhaust chip, custom bar & twin tyres

                And a PB Challenger with a list if goodies getting as long as the Paj

                Comment

                • Goodsy
                  Who ya gunna call....
                  • Dec 2010
                  • 7598
                  • Hervey Bay

                  #9
                  Nice job.
                  I was thinking a 40L marine tank for the rear. Just for cost and my lack of thin metal skills.

                  Once again. Top job. When done right I can see no safety problems at all.

                  As a note my first car a Lada Niva had the petrol tank inside the car fixed to the floor under the rear sear.
                  That passed adr's until they stopped selling them in oz.
                  Wonder if it still would?
                  .Previously an NP GLX 3.8 auto RIP
                  NS VRX DiD auto. RIP.

                  Comment

                  • Herman4x4
                    Valued Member
                    • Oct 2009
                    • 2231
                    • Melton, Victoria

                    #10
                    That is a bloody brilliant set up. Cant see safety being a problem My brother had a mazda that had the fuel tank in the boot behind the rear seat.
                    Cheers,
                    Andrew.
                    Cheers,
                    Andrew.


                    2008 NS Diesel Auto - stock as a rock. Planning Tow bar, dual battery system, cargo barrier, bullbar, winch, lights, roof rack and suspension.
                    Jayco Starcraft 17.58-3.

                    Comment

                    • MSF
                      Valued Member
                      • Jul 2009
                      • 1674
                      • Sydney, Northern Beaches

                      #11
                      Huge effort and I applaud your ingenuity, but what was your main reason for DIY when the aftermarket version is cheaper (purchase price) and possibly better* in some ways ??

                      * no half full filling problems,
                      * No need for a momentary switch for the pump
                      * ADR approved


                      As I say, huge kudos for tackling it and doing a great job but unless I am missing something, it's just reinventing the wheel ?

                      Comment

                      • conquistador
                        Valued Member
                        • Feb 2012
                        • 807
                        • sth east queensland

                        #12
                        Originally posted by Goodsy View Post
                        Nice job.
                        I was thinking a 40L marine tank for the rear. Just for cost and my lack of thin metal skills.

                        Once again. Top job. When done right I can see no safety problems at all.

                        As a note my first car a Lada Niva had the petrol tank inside the car fixed to the floor under the rear sear.
                        That passed adr's until they stopped selling them in oz.
                        Wonder if it still would?
                        Very good write up and install.

                        Very brave of you goodsy to admit to lada Niva ownership. Mine only caught fire twice

                        Comment

                        • hiedipro
                          Member
                          • Dec 2012
                          • 206
                          • Brisbane Southside, when home

                          #13
                          Originally posted by conquistador View Post
                          Very good write up and install.

                          Very brave of you goodsy to admit to lada Niva ownership. Mine only caught fire twice
                          I AM AMAZED. It survived the first fire? Didnt you do a good enough job?

                          Comment

                          • charlie2072
                            Junior Member
                            • Mar 2013
                            • 32
                            • sydney

                            #14
                            Originally posted by MSF View Post
                            Huge effort and I applaud your ingenuity, but what was your main reason for DIY when the aftermarket version is cheaper (purchase price) and possibly better* in some ways ??

                            * no half full filling problems,
                            * No need for a momentary switch for the pump
                            * ADR approved


                            As I say, huge kudos for tackling it and doing a great job but unless I am missing something, it's just reinventing the wheel ?
                            x2

                            Comment

                            • dbdb
                              Senior Member
                              • Aug 2008
                              • 330
                              • Adelaide Hills

                              #15
                              I reckon these:
                              Originally posted by Soups View Post
                              · No loss of ground clearance at the rear from an underslung tank
                              · Almost invisible installation
                              are pretty good reasons for doing it this way.
                              14 NW GLX-R automatic, dual battery, Icom 440 UHF, redarc tow pro, Bushskinz bash plates, light bar, Dobinsons suspension, HPD front mount intercooler, ARB bull bar and other stuff.
                              04 NP GLX now gone

                              Pajero Service Manual link

                              Comment

                              Matched content

                              Collapse
                              Working...
                              X