 Tweet
Tweet
looks great mate, nice neat and outta the way.. loving the factory look
-
1995 GLS 3.5, optioned to the shhizam with just couple of mods

-
Looks the Muts Nuts mate top job
Looking forward to a Pajero play date so that I can have a proper look at all your mods.
Phil05 Exceed DID Auto, uhf radio, dual batteries, ARB Bull Bar,On Board compressor, Cargo Barrier, BFG AT's, Rear telescopic Work Light, Bushskinz bash plates, Roolites, TJM XGS Gold suspension, Rear storage,Rhino Mesh platform rack, 12000lbs Winch and yet more still on the wish list!Comment
-
looks great, been toying with the idea of building one,
as someone mentioned , i reckon it would be worth going over the edges with a router just to smooth them out a bit, also you can buy headlining cloth to match from most material shops or even the wreckers with a bit of spray on glue it will look factory.
cheers camNX ARB bar totally stock,, for now and the trusty old NM Exceed ,Injected LPG. ARB Sahara bar 12000lb Tigerz11winch,Lightforce genisis ,2x stealth LED bars, rear LED reverse light, GU Patrol black wheels 32"BFGs ,custom alloy roof rack with twin awnings,, snorkel, Milford barrier, custom rear storage ,triple batteries,fridge slide,Pioneer touchscreen unit, 50L Waeco,UHF,lots of scratches down the sides, new super powerful engine!,bash plates, 3" lift,polyairs Dobinsons,extractors ,MaxtraxComment
-
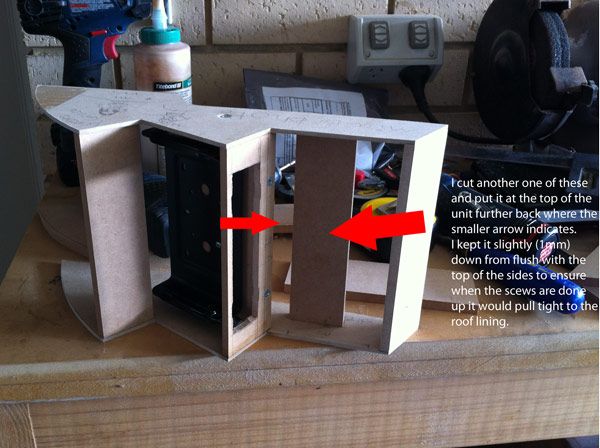
Yeah, thought about the rounded edges and would have except it is 3mm on the sides and the larger flats.
So the radius would have to be pretty tight so as not to open up the joints.
As far as wrapping in material...not sure I could get the end result I would be after with seams and all.
Peter2003 NP GLS DiD 3.2L Auto, ARB Bullbar, Narva Ultima 225's, GME TX3220, Dual Batteries, LED Rear W/Lights, Rhino HD Bars, 60L Long Ranger Aux Tank, Ebay Snorkel (no shame), Unifilter, Polyair Springs, Maxxis AT771 265/70/16, Bisho's Custom O/Head Console (pics) & Bisho's Custom Centre Console wtih Classic Chocolate Milk Holders!!(pics) ...to be continued...
")
Comment
-
Can I be a pain and ask for some pics or more info of the fastening to the actual roof. This puzzles me all the time. I know it's Through existing light but to see it would be sweet.
BrodieComment
-
What do you want to see ?
If you take your light out your will see the mounting holes that are used.
The original hold the frame of the lamps and now they hold the new console with suitable srews.
Since it is made to fit the roof line it should be enough even if heavier radios are used.'94 2.8TD, 2" lift, low mount winch, bullbar, roofrack, UHF, custom drawers, HID spotties, cam, GPS....
Password for all my files: downunder
Comment
-
No problems Brodie.Originally posted by brodie View Post
After removing the interior light I screwed a block of DAR 42x19mm pine up in there using wafer head screws (I think they were 10g, but they had the same thread as the orginal screws so no thread was damaged). I countersunk the heads into the pine to get a flush surface to fix the unit to.
I cut some of the pine away to allow wiring to get past it but you would soon work that one out.
The other thing to consider here is the earths for the light. I made up a couple of short wires with eyelets each end. I put one eyelet on each screw inbetween the timber block and metal bracket, the other end went to the new location of the light.
Here is some pics to help with it all.
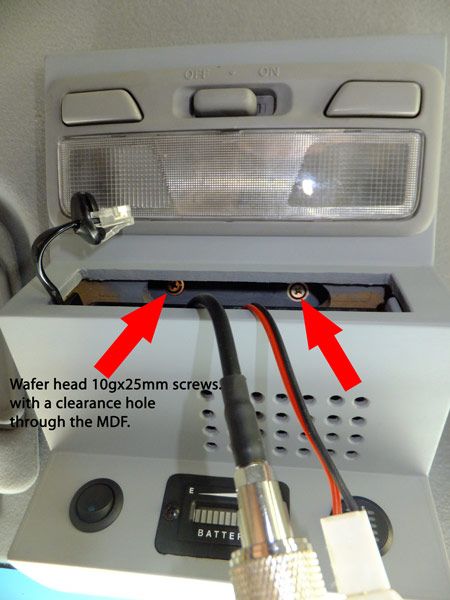
Above photo - these screws go through the 9mm cross member at the top of the unit as mentioned in the top photo, into the pine block mounted in the original light hole. Note the cutout in the MDF that has the UHF bracket mounted to it to give access to these screws.
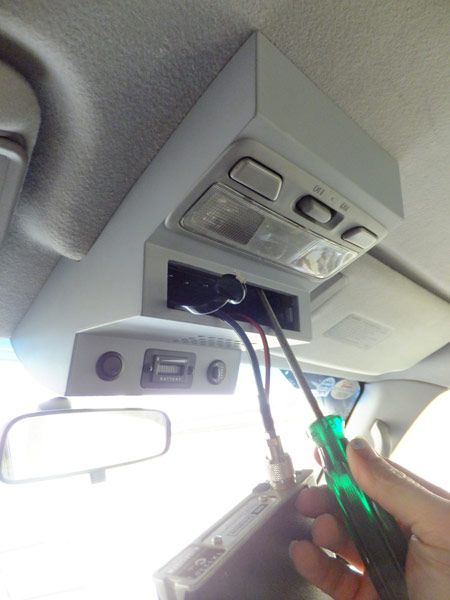
Access to these is via a hand screw driver as seen below.
Hope this helps.
Peter Last edited by Bisho; 10-10-12, 04:57 PM.2003 NP GLS DiD 3.2L Auto, ARB Bullbar, Narva Ultima 225's, GME TX3220, Dual Batteries, LED Rear W/Lights, Rhino HD Bars, 60L Long Ranger Aux Tank, Ebay Snorkel (no shame), Unifilter, Polyair Springs, Maxxis AT771 265/70/16, Bisho's Custom O/Head Console (pics) & Bisho's Custom Centre Console wtih Classic Chocolate Milk Holders!!(pics)...to be continued...
Comment
-
-
Bisho, you wouldn't happen to have the template for the roof back to the middle light by any chance do you with all the measurements and what not. trying to do a roof console on a cnc machine and cant transfer the template onto computer to then design to take uhf and toggles and what ever else. cheersComment


Comment