Below Nav Bar

Collapse

RandR Bead Breaker

Collapse
X
 
  • Filter
  • Time
  • Show
Clear All
new posts
  • stevemc181
    Valued Member
    • Sep 2012
    • 2940
    • Thornlie/Perth

    RandR Bead Breaker

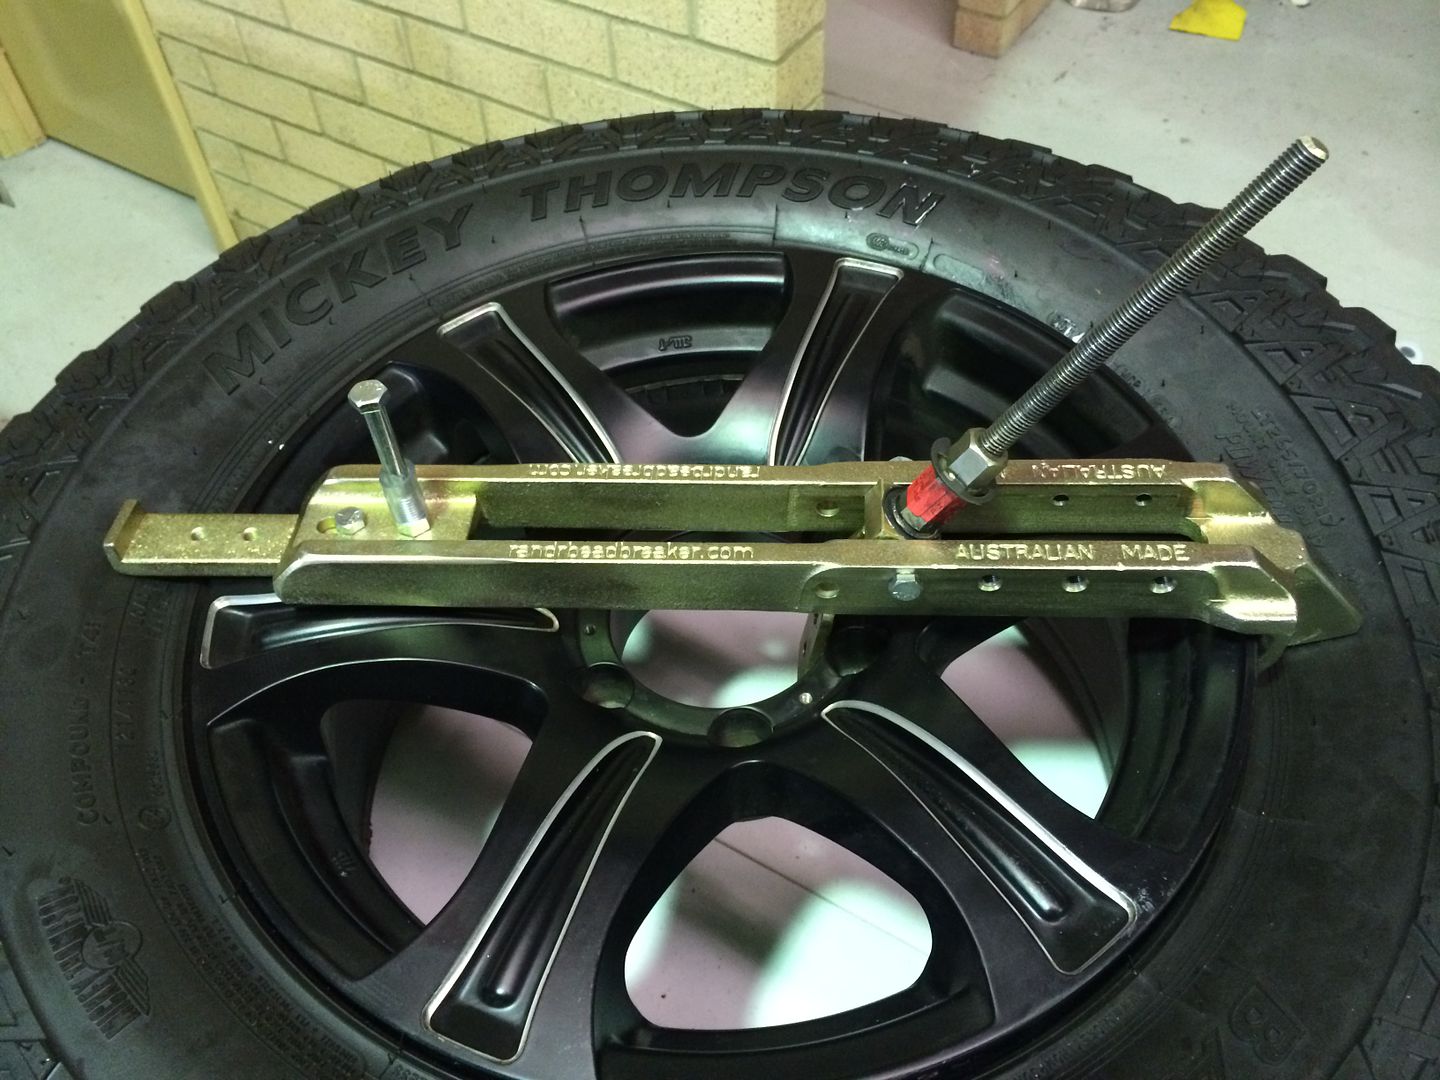
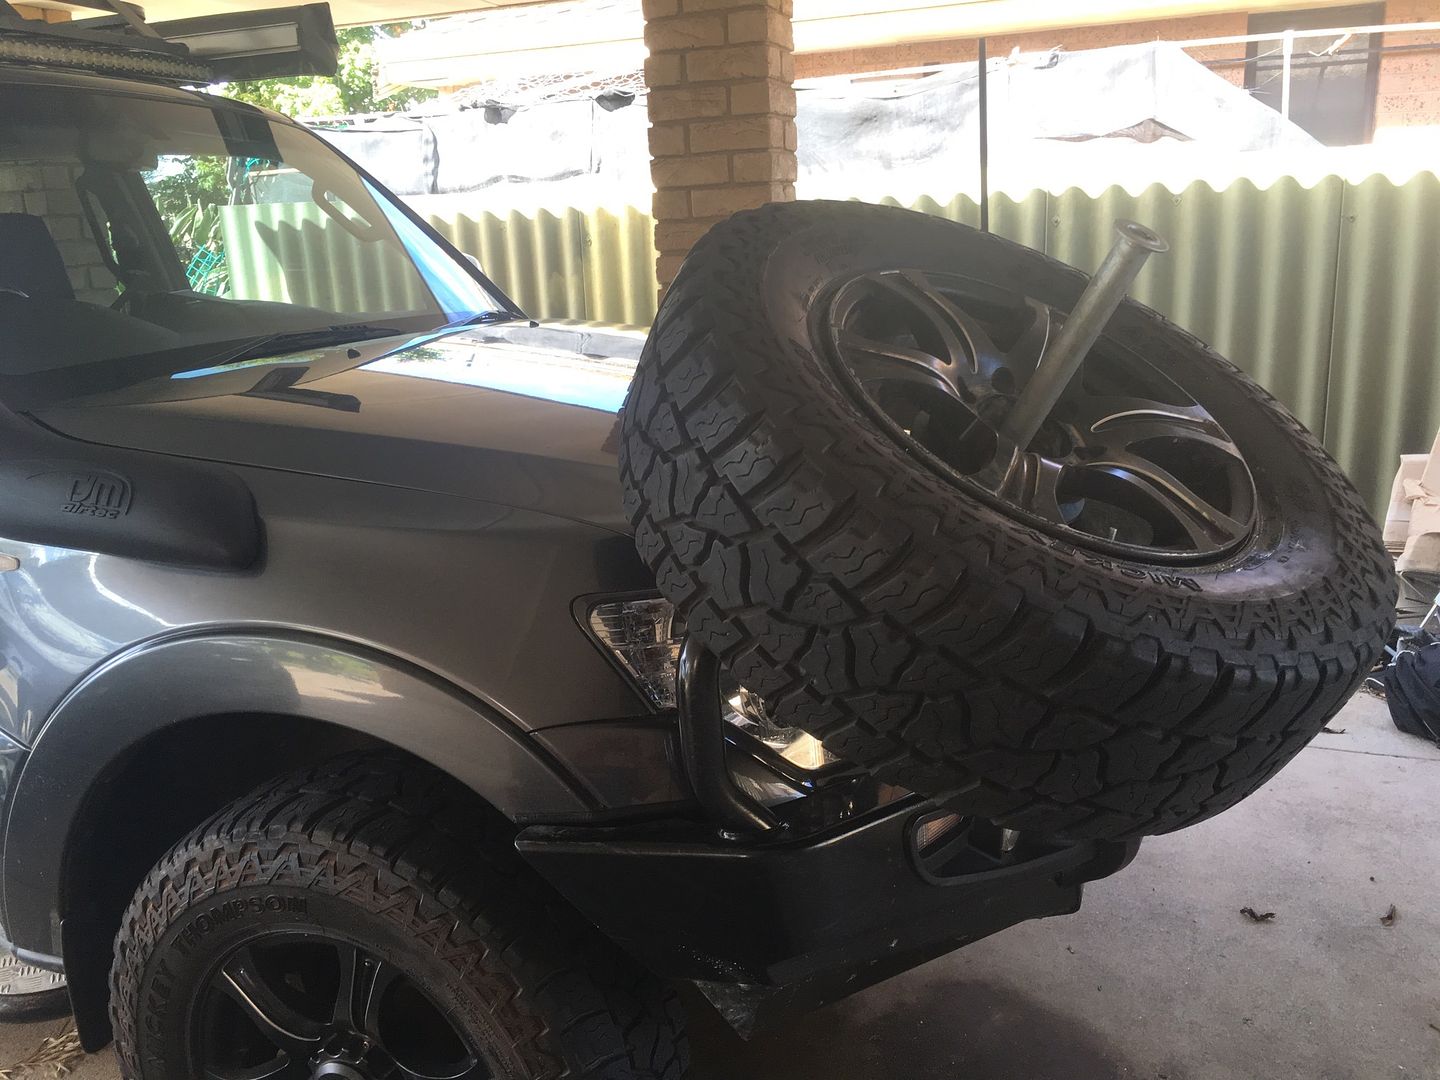
    I Bought myself an RandR bead breaker and thought I'd better give it a practice run before I really need to use it out on the tracks. It took me a while to work out what settings to start with to get the right angles etc but I got there in the end. The unit I bought has an extra long centre shaft due to the aftermarket alloys I am running.

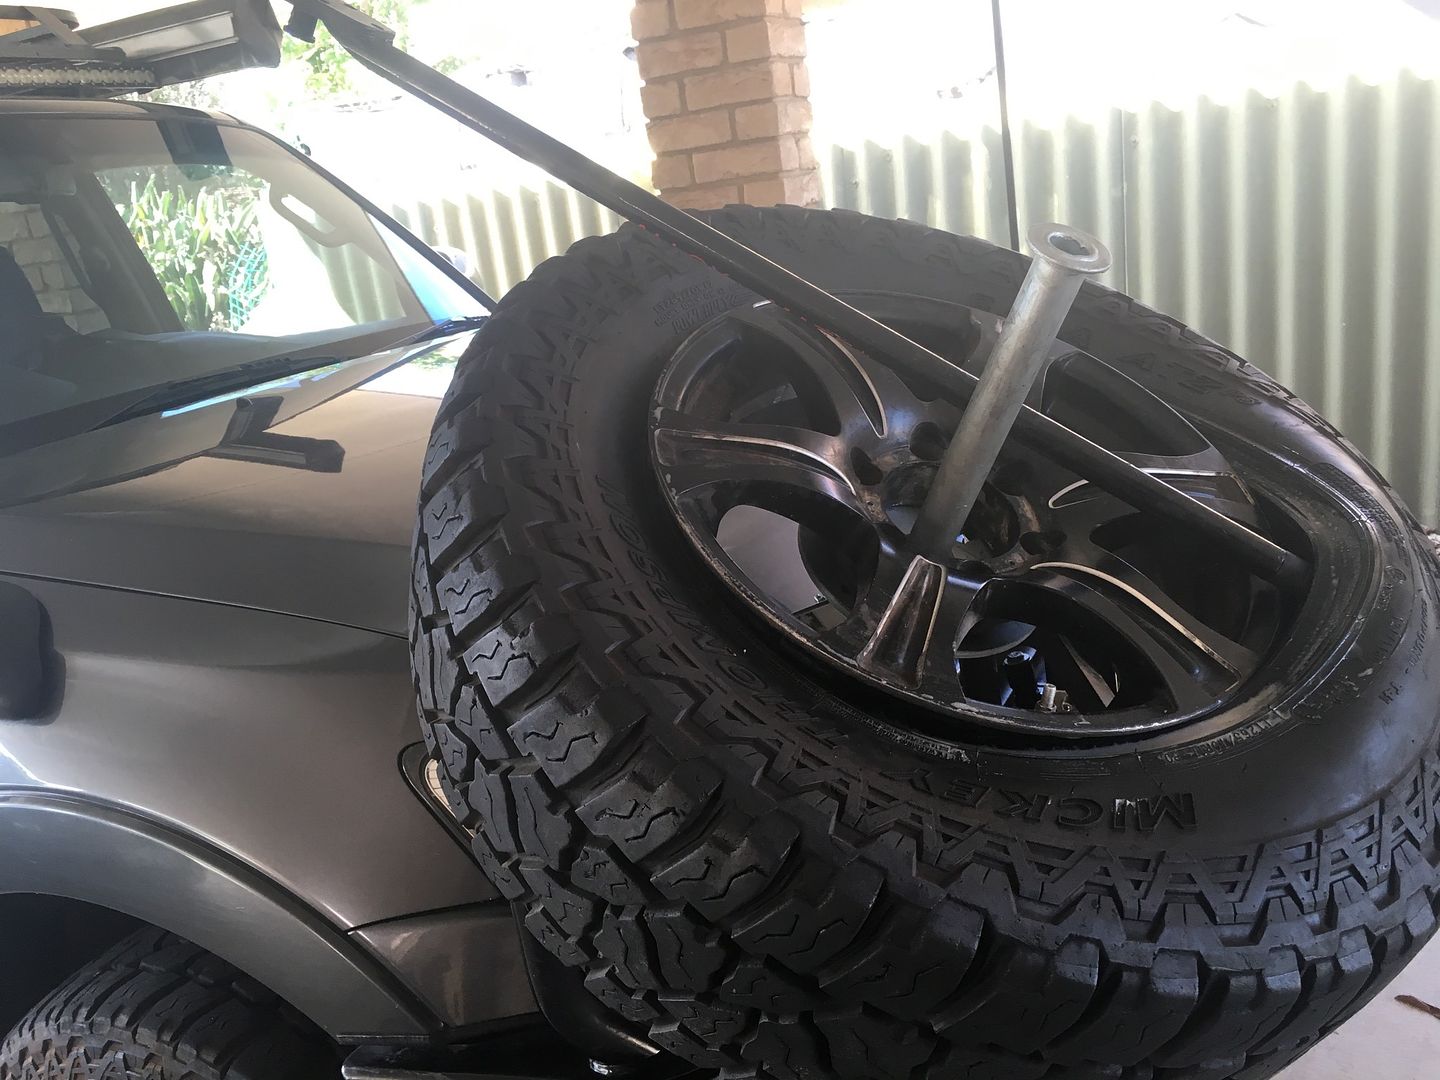
    This thing certainly makes light work of breaking the bead on either side, you just need to ensure you grease up the main threaded shaft and nut with thread lube or grease etc, otherwise it will bind up and bugger the threads. I managed to get one side of the tyre off with no damage to the alloy rim, thanks to a couple of rim protectors and a piece of hose which I clipped onto the edge of the rim, to stop lever damage.

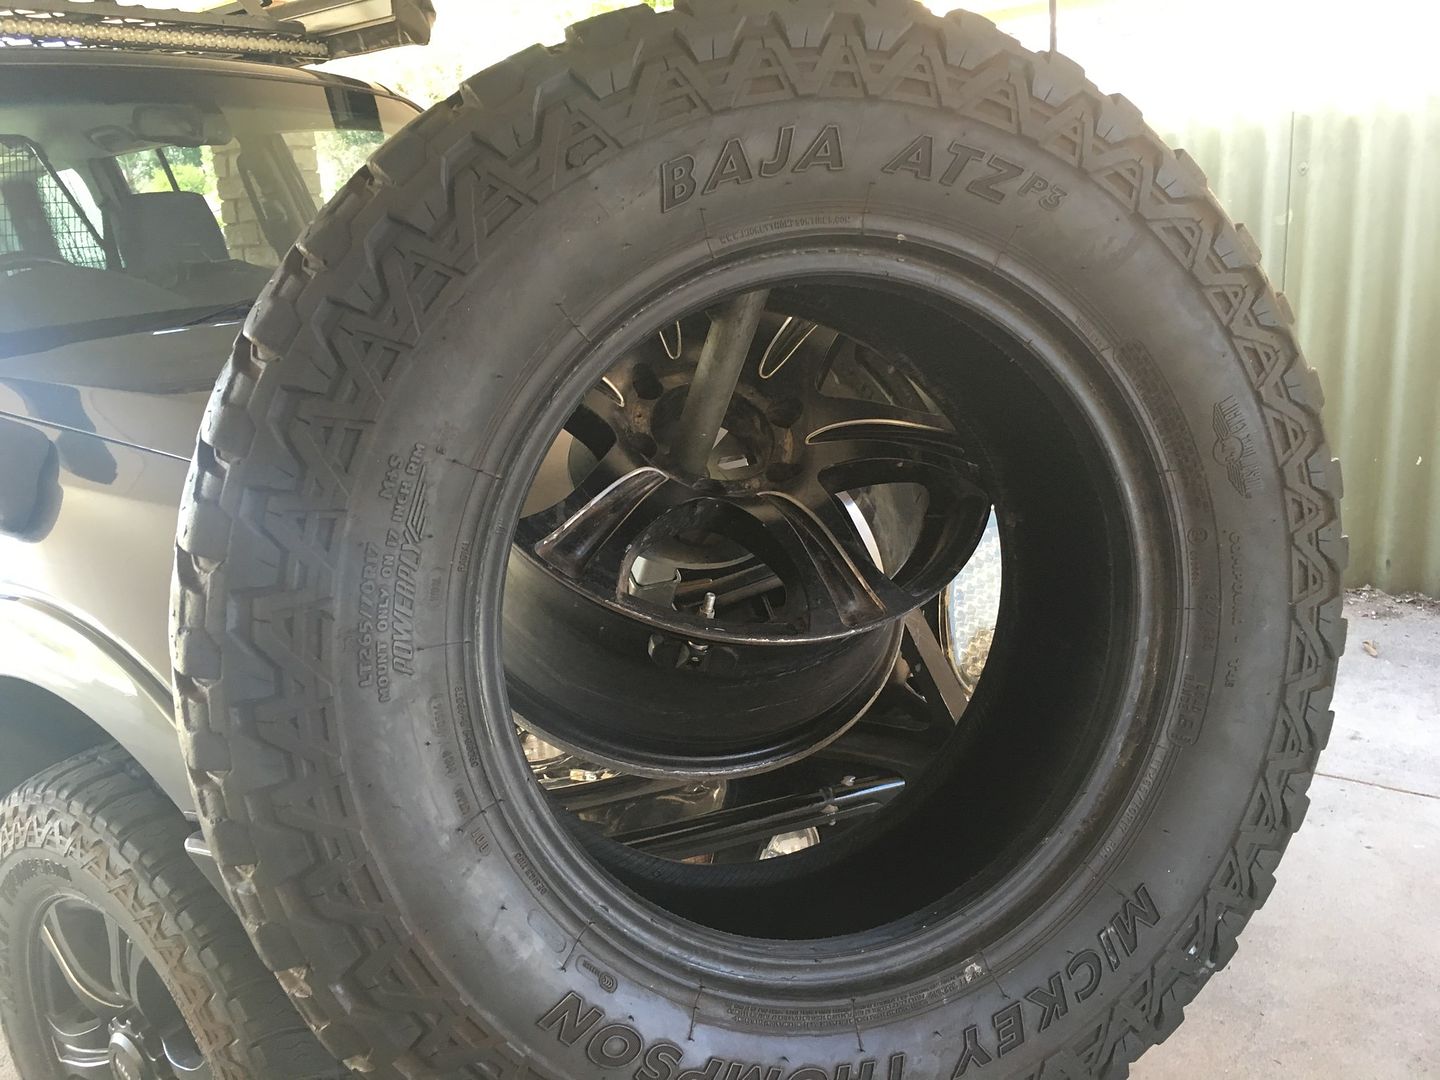
    Getting the inner bead up and over the rim is a different story, I did mark the rim a little with the tyre lever, but this was my impatience showing through when I didn't realise I had the lever pushing on the rim spoked face. I tried a few different methods, but think it would be near impossible to remove the tyre fully without marking the rim. I wasn't willing to damage the rim practising, but the majority of repairs will be able to be carried out with both beads broken and one side removed fully from the rim. If I get into a situation that requires the tyre to be removed fully, then I know it can be done, but cosmetic damage will be near on impossible to avoid with these rims.


    Looking at the rims, I think it may be possible to remove the tyre from the rear of the rim, where cosmetic damage won't matter, I'll give it a go if and when the need arises. Getting the tyre back on was relatively easy using the bead breaker, all in all a very handy piece of gear and easy to use once you work it out.

    I thought I might have some difficulty in reseating the tyre, but I managed to reseat it with the ARB compressor and the valve in the tyre already, this surprised me how easily it seated it self. I used a quality Tech tyre lube and plenty of it though, so maybe this helped.

    Hopefully I'll never have to use it, but good to know when I am in a remote area that I have options. I've used tyre pliers before on split rims, and the RandR bead breaker, while slower, is a lot less effort and also helps getting the tyre back on the rim.


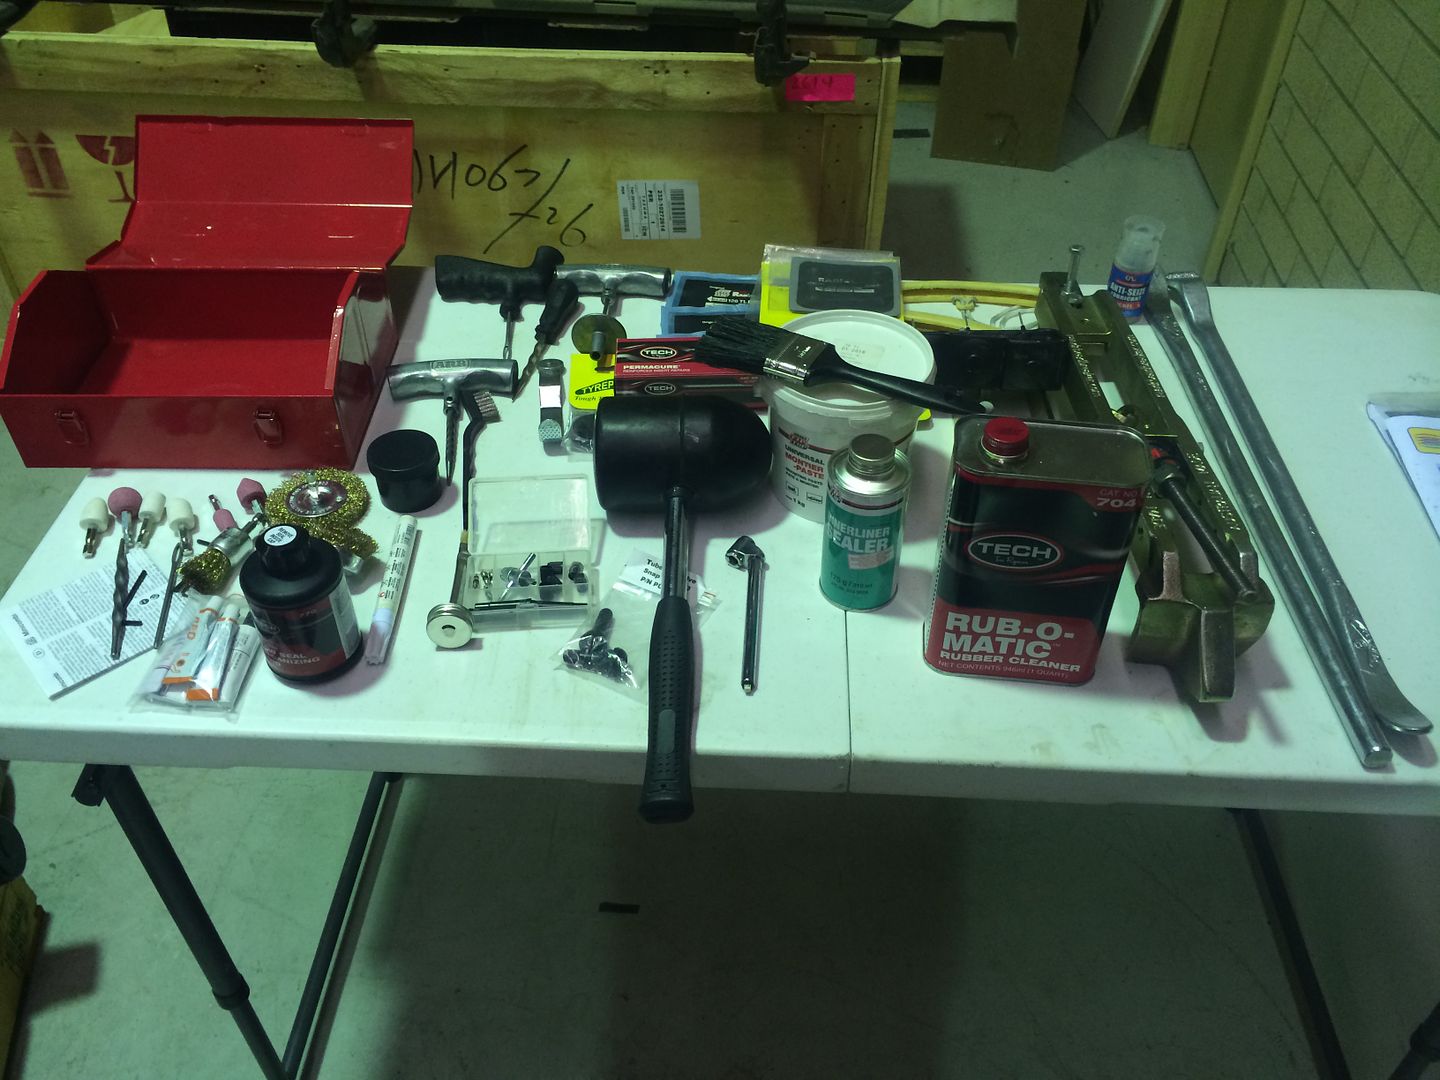
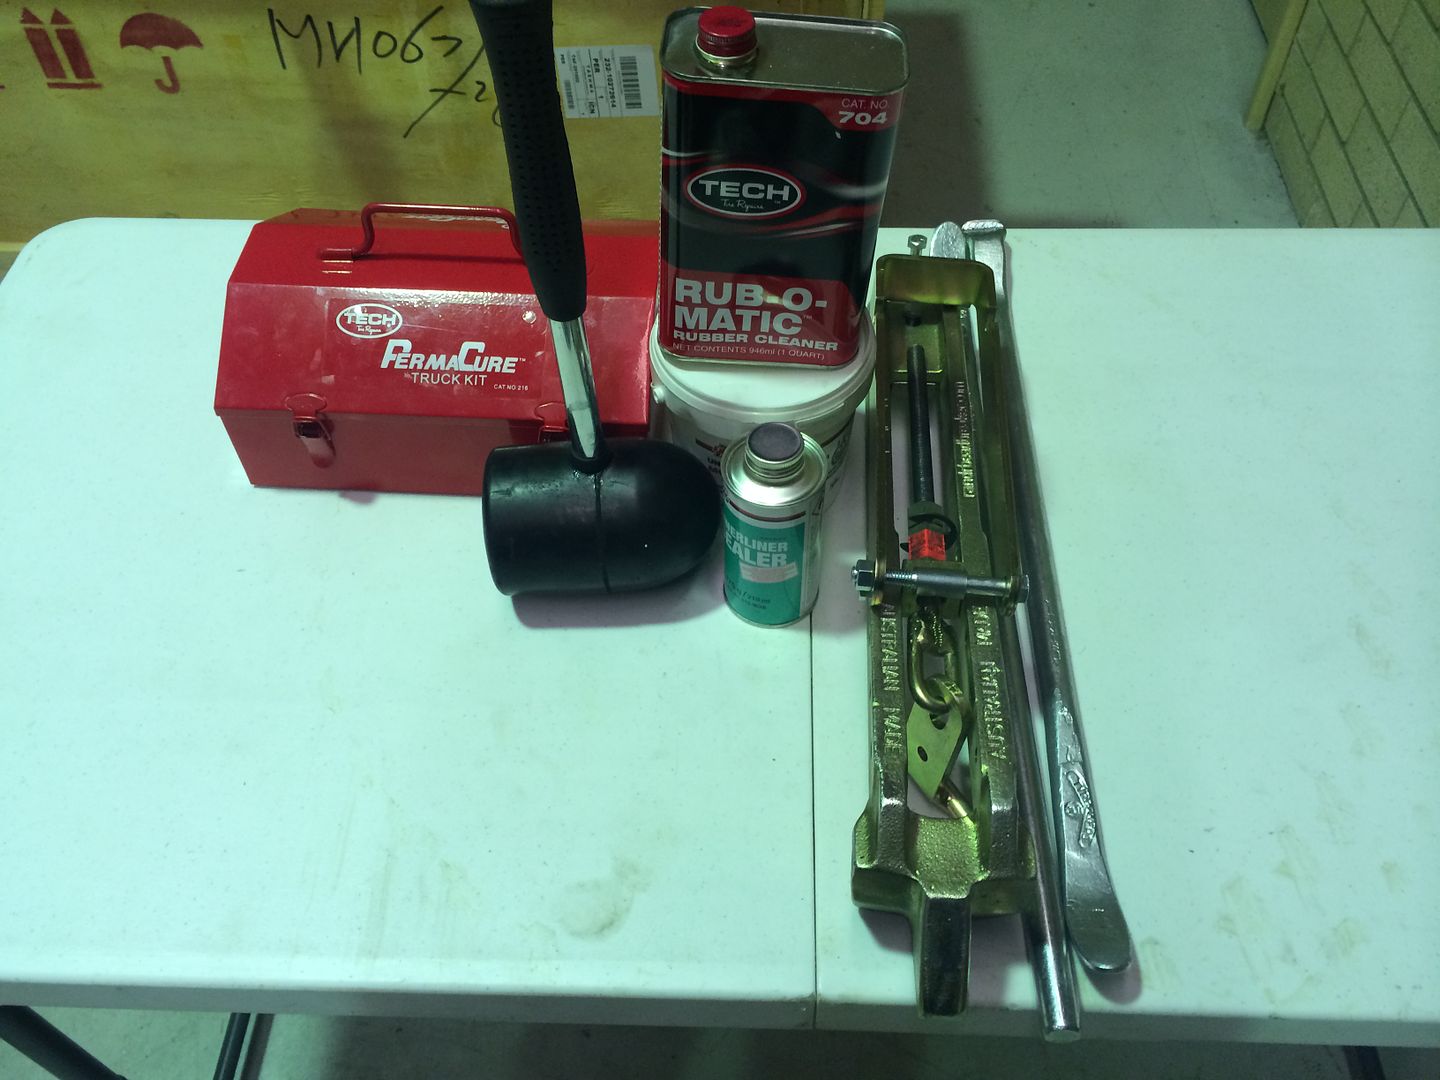
    I thought I would post a pic of the tyre changing gear I carry when it's all laid out on the table. Looks like a lot but it all condenses and packs pretty well into a steel container. I also carry two tubes with me just in case a tyre is not fully repairable and I need to get to the next town. I need to remember to throw a small bottle of talcum powder in the kit, just in case I ever use the tubes.


    2012 NW Activ with all the fruit, stripped what I could for my new build and handed over to the Mrs as a daily driver.

    Current vehicle: 2016 Y61 GU Patrol Legend series Auto, (Last of the Breed)
    3505kg GVM Upgrade and 2" Lift | Warn XD 9000 Winch | Factory steel bar, towbar, snorkel, alloy roof rack | 285/70/17 (33") Mickey T ATZ P3's | 3" Manta Exhaust | ORS Drawer System | Manual Boost Controller | ECU Remap |
  • old Jack
    Regular
    • Jun 2011
    • 11607
    • Adelaide, South Australia.

    #2
    Hi Steve,

    With 10 ply LT rated tyres it is difficult to remove the tyre, and due to the rim offset it is almost impossible to remove from the back of the rim without damaging rim or tyres! So best to go from the front side. Secret is to use plenty of lube, 3 tyre levers, take little "bites" and ensure the opposite side of the bead that is being removed is tucked into the part of the rim that is the smallest diameter. Reverse applies when refitting tyre on to rim.

    cheers, old Jack.
    2011 PB Base White Auto, Smartbar, Cooper STMaxx LT235/85R-16,TPMS, HR TB, 3 x Bushskinz, front +40mm Dobinson , rear +50mm EHDVR Lovells, Dobinson MT struts and shockers, Peddars 5899 cone springs, Windcheater rack, GME UHF, Custom alloy drawer system inc. 30lt Engel & 2 x 30 AH LiFePo batteries + elec controls, Tailgate hi-lift/long struts, Phillips +100 LB & HB, Lightforce 20" single row driving beam LED lightbar, Scanguage II.
    MM4x4 Auto Mate, Serial No 1 .

    Comment

    • stevemc181
      Valued Member
      • Sep 2012
      • 2940
      • Thornlie/Perth

      #3
      Cheers for the advice old jack, I'll probably have another crack at it on the weekend and see how I go. I'd rather get the practice in now and get some sort of method formed in my mind. Just in case I need to do it with a tribe of fellow campers watching
      The tyres are certainly strong as buggery in the side walls with not a lot of give. Getting the levers in on the inner bead without scratching the wheel is the problem. I'm thinking I might cut up a piece of hose to slip over the rim to offer a bit of protection when getting it started. The short rim protectors fall off too easily.

      It would be an easy job with steel rims, the alloys are certainly a pain in the butt when it comes to levering a tyre off and not wanting to mark the rim. I'm not one to give up easily though, so I'll work out a method to suit.
      2012 NW Activ with all the fruit, stripped what I could for my new build and handed over to the Mrs as a daily driver.

      Current vehicle: 2016 Y61 GU Patrol Legend series Auto, (Last of the Breed)
      3505kg GVM Upgrade and 2" Lift | Warn XD 9000 Winch | Factory steel bar, towbar, snorkel, alloy roof rack | 285/70/17 (33") Mickey T ATZ P3's | 3" Manta Exhaust | ORS Drawer System | Manual Boost Controller | ECU Remap |

      Comment

      • GHendo
        Valued Member
        • Mar 2012
        • 4375
        • Northern NSW

        #4
        That looks like a great bit of insurance to take on a trip to remote areas. I must keep it in mind if I ever get around to doing a trip outback.

        Cheers

        Geoff
        03 NP Manual Di-D Exceed, 2" lift, Dobinsons Springs, Lovells Shocks, ORU Winch, ARB Bullbar, Scott's Rods 3" Exhaust, ARB Compressor, Rear Air Locker, Cooper S/T Maxx, Hella Rallye 4000 S/Lights, Pioneer AVH-X5850BT DVD/Tuner w/- Reversing Camera, Sensa Tyre monitor, Uniden UH8080NB UHF, Rhino Platform Roof Rack, Hema HN-7 GPS, Engine Watchdog, CouplerTec, CTEK D250S DC-DC Charger, Snorkel, Towbar.

        Comment

        • old Jack
          Regular
          • Jun 2011
          • 11607
          • Adelaide, South Australia.

          #5
          Hi Steve,

          I avoid dismounting tyres from rims now days, it is only if all other repair efforts have failed. I still do a demo when I do a training session and I use a 10ply LT on a steel rim, when asked to do a demo on someone's alloys I have some pieces of thick Heavy Duty reinforced rubber hose that I slide over the actual tyre lever, I find this better than split hose on the rim. Also I have about 1.5 metres of 25mm wide webbing, I use this to pull both the beads together up in the narrow section of the rim on the opposite side to where I am levering the tyre off the rim.

          cheers, old Jack.
          2011 PB Base White Auto, Smartbar, Cooper STMaxx LT235/85R-16,TPMS, HR TB, 3 x Bushskinz, front +40mm Dobinson , rear +50mm EHDVR Lovells, Dobinson MT struts and shockers, Peddars 5899 cone springs, Windcheater rack, GME UHF, Custom alloy drawer system inc. 30lt Engel & 2 x 30 AH LiFePo batteries + elec controls, Tailgate hi-lift/long struts, Phillips +100 LB & HB, Lightforce 20" single row driving beam LED lightbar, Scanguage II.
          MM4x4 Auto Mate, Serial No 1 .

          Comment

          • stevemc181
            Valued Member
            • Sep 2012
            • 2940
            • Thornlie/Perth

            #6
            Originally posted by old Jack View Post
            Hi Steve,

            I avoid dismounting tyres from rims now days, it is only if all other repair efforts have failed. I still do a demo when I do a training session and I use a 10ply LT on a steel rim, when asked to do a demo on someone's alloys I have some pieces of thick Heavy Duty reinforced rubber hose that I slide over the actual tyre lever, I find this better than split hose on the rim. Also I have about 1.5 metres of 25mm wide webbing, I use this to pull both the beads together up in the narrow section of the rim on the opposite side to where I am levering the tyre off the rim.

            cheers, old Jack.
            Yep, I think I'll employ the same strategy and only fully dismount the tyre in the event I have no other options. As mentioned above I can break the beads easily enough and remove one side of the tyre, this gives me enough room to access most tread and shoulder area repairs, although obviously it would be a lot easier to get to with the rim out of the way completely, but I can live with that. I guess if I am in a bad enough situation and removal is the only option to get me to the next town then cosmetic marking of the rim is neither here nor there.

            I was having a look on the web and came across this product called Alloy Mate http://alloy-mate.webs.com/

            Would be handy if we had a mobile version of the same tool, it's left me wondering about making up some sort of bolt on adapter for the rim as a pivot point for the alloy mate bar. The video's always make it look a hell of a lot easier than it is though.

            Anybody used this device or similar?
            2012 NW Activ with all the fruit, stripped what I could for my new build and handed over to the Mrs as a daily driver.

            Current vehicle: 2016 Y61 GU Patrol Legend series Auto, (Last of the Breed)
            3505kg GVM Upgrade and 2" Lift | Warn XD 9000 Winch | Factory steel bar, towbar, snorkel, alloy roof rack | 285/70/17 (33") Mickey T ATZ P3's | 3" Manta Exhaust | ORS Drawer System | Manual Boost Controller | ECU Remap |

            Comment

            • stevemc181
              Valued Member
              • Sep 2012
              • 2940
              • Thornlie/Perth

              #7
              I've added a few more tools to the tyre changing Arsenal !

              I decided to buy the alloy-mate tyre bar and also bought a tyre changing head and a bullbar mount from Tyre Pliers engineering.
              I gave it a quick workout this afternoon on an old cracked alloy with a HT tyre fitted. Much much easier than using tyre levers. Heaps of tyre lube is the go and I had the tyre off in no time. I can't believe how much easier it is to use a dedicated tyre bar than struggling with levers. No damage to my alloy wheel and just need to work on my method a bit more and changing/repairing tyres when remote will be as easy as it can be.

              I am a pushed for time for the next week or so, as I'm heading to Vietnam for work. I'll give the gear a go on one of my Mickey T P3’s when I get back and take a few pics. Same as most things I guess, there is a technique that needs to be worked out and it should be no issue changing tyres on alloys once I've worked out the finer points.

              Alloy-Mate Bar: http://alloy-mate.webs.com
              Tyre pliers part number TC165 and TC150 http://www.tyrepliers.com.au/New/tyrechanger.html

              Scroll to the 30 second mark here and they show the bullbar mount http://youtu.be/Sn2KQgQvyH4
              2012 NW Activ with all the fruit, stripped what I could for my new build and handed over to the Mrs as a daily driver.

              Current vehicle: 2016 Y61 GU Patrol Legend series Auto, (Last of the Breed)
              3505kg GVM Upgrade and 2" Lift | Warn XD 9000 Winch | Factory steel bar, towbar, snorkel, alloy roof rack | 285/70/17 (33") Mickey T ATZ P3's | 3" Manta Exhaust | ORS Drawer System | Manual Boost Controller | ECU Remap |

              Comment

              • robdavo
                Member
                • Dec 2013
                • 237
                • Wantirna, Vic

                #8
                Hi Steve. I've had one of these units for years, and they are fabulous. Used it more for others rather than myself. Usually wait to see if the happy camper trying to change his tyre with rubber mallet and tyre leversis OK, or wants to try it out. Most have a go with their gear first, and just before they are about to start throwing things, generally give in and accept the offer. Be prepared.
                Made up a bullbar mount first for my Patrol, then later for the Navara, but for the Challenger I have a 50mm sq angle that goes into the rear hitch. Have only tried a dummy instal to check mount clearances, but all looks OK.

                My main question is though, did you buy your Alloy bar in Oz or overseas, as the standard bar is a bit iffy on alloys.
                Rob
                MY14 PC Challenger Auto, Terra Rosa, Rear Storage Drawer and Fridge System, 120Ah Dual Battery, Traxide SC80 Isolator, H/Reece Hitch. Tekonsha Primus IQ Brake Controller, LED Running Lights, 80W LED Light Bar, Factory (PB) Nudge Bar. Thule Racks, GME TX3510 CB, Poly Airs, MN Triton 17" wheels. Tinted windows, deflectors and bonnet guard. Headlight protectors.

                Comment

                • stevemc181
                  Valued Member
                  • Sep 2012
                  • 2940
                  • Thornlie/Perth

                  #9
                  Originally posted by robdavo View Post

                  My main question is though, did you buy your Alloy bar in Oz or overseas, as the standard bar is a bit iffy on alloys.
                  Rob
                  I bought the alloy-mate bar direct from the guy that makes them in the UK, wasn't cheap with freight, but he was great to deal with and its a solid, well made bit of gear. His contact details are in the link above. Everything I could find on these, points to them being a fair bit stronger than the similar Sealy TC963 Bar. They do note though, that using this bar on steel wheels will wreck it.

                  I also thought about making up a tow bar mount for it, but thought I'd try the bullbar one from Tyre pliers first, to try and keep the weight down a bit. I did have a few issues wth stopping it rotating on the bullbar, so I'll look into this when I can in a couple of weeks time, might need a slight mod or just further tightening may be enough.
                  Last edited by stevemc181; 17-03-16, 12:05 AM.
                  2012 NW Activ with all the fruit, stripped what I could for my new build and handed over to the Mrs as a daily driver.

                  Current vehicle: 2016 Y61 GU Patrol Legend series Auto, (Last of the Breed)
                  3505kg GVM Upgrade and 2" Lift | Warn XD 9000 Winch | Factory steel bar, towbar, snorkel, alloy roof rack | 285/70/17 (33") Mickey T ATZ P3's | 3" Manta Exhaust | ORS Drawer System | Manual Boost Controller | ECU Remap |

                  Comment

                  • robdavo
                    Member
                    • Dec 2013
                    • 237
                    • Wantirna, Vic

                    #10
                    Thanks Steve. I had similar problems with the bullbar clamp, although I made mine and didn't buy theirs, but stopped it rotating by adding a brace down to the bumper section of the bullbar.
                    MY14 PC Challenger Auto, Terra Rosa, Rear Storage Drawer and Fridge System, 120Ah Dual Battery, Traxide SC80 Isolator, H/Reece Hitch. Tekonsha Primus IQ Brake Controller, LED Running Lights, 80W LED Light Bar, Factory (PB) Nudge Bar. Thule Racks, GME TX3510 CB, Poly Airs, MN Triton 17" wheels. Tinted windows, deflectors and bonnet guard. Headlight protectors.

                    Comment

                    • stevemc181
                      Valued Member
                      • Sep 2012
                      • 2940
                      • Thornlie/Perth

                      #11
                      Originally posted by robdavo View Post
                      Thanks Steve. I had similar problems with the bullbar clamp, although I made mine and didn't buy theirs, but stopped it rotating by adding a brace down to the bumper section of the bullbar.
                      Yep, I was thinking something similar or just drilling in a locating dowel to the back of the bullbar. I did find it was a bit high though on the bull-bar, so I may end up just making a small angled receiver for the towbar. I'll get onto it after Easter and play around a bit more.
                      2012 NW Activ with all the fruit, stripped what I could for my new build and handed over to the Mrs as a daily driver.

                      Current vehicle: 2016 Y61 GU Patrol Legend series Auto, (Last of the Breed)
                      3505kg GVM Upgrade and 2" Lift | Warn XD 9000 Winch | Factory steel bar, towbar, snorkel, alloy roof rack | 285/70/17 (33") Mickey T ATZ P3's | 3" Manta Exhaust | ORS Drawer System | Manual Boost Controller | ECU Remap |

                      Comment

                      • stevemc181
                        Valued Member
                        • Sep 2012
                        • 2940
                        • Thornlie/Perth

                        #12
                        I ended up drilling a couple of holes in the top bullbar rail and through the Tyrepliers mounting clamp. This has at least stopped the clamp rotating and makes it a lot easier to work with the tyre. I had a go with one of my alloys and the Mickey T ATZ P3, these are a bloody tough sidewall and there is still quite a bit of effort required in getting the inner bead off with the alloy-mate tyre bar. I found it easier if I levered the tyre out a bit with a standard tyre lever to give me enough room to get the alloy-mate head in.

                        I also used the standard lever to stop the bead following me around when I put the tyre back on. A simple bead clamp would do the trick here. As mentioned, still quite a bit of effort required with the heavy AT tyres, but the bottom line is that I now know it can be done without damaging the wheel or tyre if I need to do it trackside. I also know I can do it without damaging the Internal TPMS sensor. This gives me some peace of mind that when traveling solo I have plenty of viable repair options with me.
                        I removed the permacure plug that I had inserted in the ATZ P3 and replaced it with a mushroom patch, I was surprised at how little was actually holding the Perma-cure plug in and how easily I could remove it. The internal mushroom patch is a far better system than a simple plug and the alloy-mate bar is much easier than using standard tyre levers.
                        2012 NW Activ with all the fruit, stripped what I could for my new build and handed over to the Mrs as a daily driver.

                        Current vehicle: 2016 Y61 GU Patrol Legend series Auto, (Last of the Breed)
                        3505kg GVM Upgrade and 2" Lift | Warn XD 9000 Winch | Factory steel bar, towbar, snorkel, alloy roof rack | 285/70/17 (33") Mickey T ATZ P3's | 3" Manta Exhaust | ORS Drawer System | Manual Boost Controller | ECU Remap |

                        Comment

                        • robdavo
                          Member
                          • Dec 2013
                          • 237
                          • Wantirna, Vic

                          #13
                          Good job Steve.
                          Alloys and AT's can be a difficult combo as you have discovered. One little tip, especially applicable to steel rims, is to mark the rim where the wheel weights are (I use a bottle of whiteout/liquid paper) to mark where the weights are, as they can easily be moved or dislodged with the removal tool. This stuff is also good to mark the tyre puncture point, as well as indicating the valve point for correct balance refitment.
                          Alloys generally have the adhesive wheel weights, but not always, but alignment still applies. R&R usually supply heavy duty nylon rim protectors for use on alloys, but mine got brittle and cracked, so get a couple of bits of HD plastic tubing or garden hose and cut into 100mm lengths with a decent slot width to fit over the rim and use these.
                          MY14 PC Challenger Auto, Terra Rosa, Rear Storage Drawer and Fridge System, 120Ah Dual Battery, Traxide SC80 Isolator, H/Reece Hitch. Tekonsha Primus IQ Brake Controller, LED Running Lights, 80W LED Light Bar, Factory (PB) Nudge Bar. Thule Racks, GME TX3510 CB, Poly Airs, MN Triton 17" wheels. Tinted windows, deflectors and bonnet guard. Headlight protectors.

                          Comment

                          • stevemc181
                            Valued Member
                            • Sep 2012
                            • 2940
                            • Thornlie/Perth

                            #14
                            Originally posted by robdavo View Post
                            Good job Steve.
                            Alloys and AT's can be a difficult combo as you have discovered. One little tip, especially applicable to steel rims, is to mark the rim where the wheel weights are (I use a bottle of whiteout/liquid paper) to mark where the weights are, as they can easily be moved or dislodged with the removal tool. This stuff is also good to mark the tyre puncture point, as well as indicating the valve point for correct balance refitment.
                            Alloys generally have the adhesive wheel weights, but not always, but alignment still applies. R&R usually supply heavy duty nylon rim protectors for use on alloys, but mine got brittle and cracked, so get a couple of bits of HD plastic tubing or garden hose and cut into 100mm lengths with a decent slot width to fit over the rim and use these.
                            Yep, I have a tyre crayon that I use to indicate position of the tyre on the wheel etc. I also have the R&R rim protectors, but find them a pain to use as they don't suit my rim shape very well. The heavy duty hose would be better. The Alloymate bar and tyre changer head has solved most of the issues I was having. Just hope I don't need to use it very often
                            2012 NW Activ with all the fruit, stripped what I could for my new build and handed over to the Mrs as a daily driver.

                            Current vehicle: 2016 Y61 GU Patrol Legend series Auto, (Last of the Breed)
                            3505kg GVM Upgrade and 2" Lift | Warn XD 9000 Winch | Factory steel bar, towbar, snorkel, alloy roof rack | 285/70/17 (33") Mickey T ATZ P3's | 3" Manta Exhaust | ORS Drawer System | Manual Boost Controller | ECU Remap |

                            Comment

                            • stevemc181
                              Valued Member
                              • Sep 2012
                              • 2940
                              • Thornlie/Perth

                              #15
                              A few pics of the Tyre pliers bullbar mounted head and the alloy-mate tyre bar in action. I struggled a bit with this one, but got the job done. I've since bought some tyre demounting paste called No-Mar, so I'll be interested to see if it makes it any easier. To be honest I think it's just a matter of getting the technique right.


                              2012 NW Activ with all the fruit, stripped what I could for my new build and handed over to the Mrs as a daily driver.

                              Current vehicle: 2016 Y61 GU Patrol Legend series Auto, (Last of the Breed)
                              3505kg GVM Upgrade and 2" Lift | Warn XD 9000 Winch | Factory steel bar, towbar, snorkel, alloy roof rack | 285/70/17 (33") Mickey T ATZ P3's | 3" Manta Exhaust | ORS Drawer System | Manual Boost Controller | ECU Remap |

                              Comment

                              Matched content

                              Collapse
                              Working...
                              X