 Tweet
Tweet
Hi Guys,
I installed a set of driving lights on the weekend and have it all wired up bar the connection to the head light.
I can confirm the NT is negatively switched (used a fuse tap with no joy) and with my wiring I simply need to tap the highbeam BUT the harness is way down in the engine bay making it all but impossible to get a splice onto.
I prefer to to avoid any of those joiners and do a solder and heat shrink job to make sure its done right and no moisture will get it.
I want to make sure they come on with highbeam. I know its no longer a requirement but its easier to dip with oncoming traffic instead of reaching for switches as well.
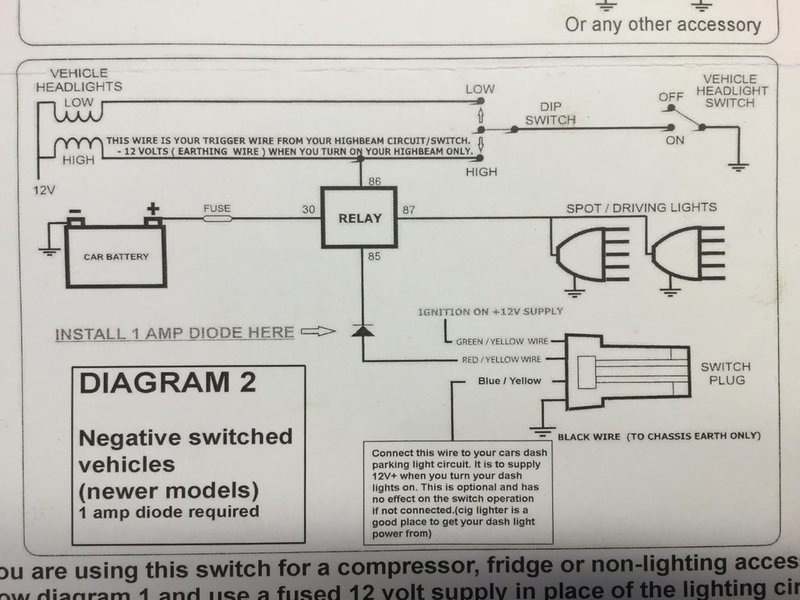
I'm chasing the red/yellow wire I believe but can't even get two hands on it to test to be sure.
If anyone has traced the wire and knows if it is easily accessible higher up, I'd like to know and would happily bare your first born child or buy you a beer. Which ever you prefer.
FYI I'm using this wiring plan
I installed a set of driving lights on the weekend and have it all wired up bar the connection to the head light.
I can confirm the NT is negatively switched (used a fuse tap with no joy) and with my wiring I simply need to tap the highbeam BUT the harness is way down in the engine bay making it all but impossible to get a splice onto.
I prefer to to avoid any of those joiners and do a solder and heat shrink job to make sure its done right and no moisture will get it.
I want to make sure they come on with highbeam. I know its no longer a requirement but its easier to dip with oncoming traffic instead of reaching for switches as well.
I'm chasing the red/yellow wire I believe but can't even get two hands on it to test to be sure.
If anyone has traced the wire and knows if it is easily accessible higher up, I'd like to know and would happily bare your first born child or buy you a beer. Which ever you prefer.
FYI I'm using this wiring plan


 Yep, the message is "engage brain before typing".
 I backtracked and removed the feed that powered the switch light, replaced the parking light fuse and the system works as it should have. Apart from step number five I have a working lightbar that is all legal. Not having the switch illuminate is no big deal in reality.
 Driving Pajero number three.
Comment